
One line summary
A guide to delegating Google Calendar management to a Virtual Assistant.
Short summary
Delegating your Google Workspace calendar to a Virtual Assistant can streamline scheduling, reduce errors, and enhance productivity. Key steps include ensuring administrative privileges, granting access, and setting clear guidelines for calendar management. Regular reviews and effective communication are essential for success.
Canonical URL
Authors
Related Posts
Ready to Publish
Ready to Publish
Step-by-Step Guide to Delegating Your Google Workspace Calendar to Your Virtual Assistant
Don't you hate it when you schedule two appointments at the same time or forget to create an invite to call someone?
Managing a calendar can be time-consuming and sometimes stressful for entrepreneurs and leaders.
Delegating your Google Workspace calendar to a Virtual Assistant (VA) can streamline your schedule management, ensuring you never miss an important appointment or meeting. This guide provides a detailed walkthrough of how to easily and securely delegate your calendar to your VA.
Understanding Calendar Delegation in Google Workspace
Google Workspace delegation is a powerful feature that allows users to grant access to their email, calendar, and documents to specific team members or virtual assistants. This functionality is designed to enhance collaboration and boost productivity within organizations. By delegating access, executives, administrative assistants, and team members can work together more efficiently, ensuring that tasks are managed seamlessly within the Google Workspace domain.
When you grant access to your virtual assistants, they can manage your email messages, schedule appointments, and handle other administrative tasks on your behalf. This not only saves time but also ensures that your workflow remains uninterrupted. Whether you need help with email management, calendar scheduling, or document handling, Google Workspace delegation provides a secure and effective solution.
Preparing for Delegation
Before you set up delegation, it’s crucial to prepare your Google Workspace account and ensure that you have the necessary permissions. Here are the steps to follow:
- Ensure Administrative Privileges: Verify that you have a Google Workspace account with administrative privileges. This is essential for granting delegate access.
- Verify Delegate’s Account: Ensure that the delegate has a Google Workspace account within the same domain. This ensures compatibility and seamless integration.
- Review Permissions: Check the delegate’s permissions to ensure they have the necessary access levels to perform their tasks effectively.
- Communicate Roles and Responsibilities: Have a clear discussion with the delegate about their role and responsibilities. This ensures that they understand what is expected of them and can perform their tasks efficiently.
By following these steps, you can ensure that your Google Workspace account is ready for delegation, and your virtual assistant is well-prepared to take on their new responsibilities.
Understanding Calendar Delegation in Google Workspace: Let Users Delegate Access
Calendar delegation in Google Workspace is a feature that allows you to grant access to your calendar to another person, such as a Virtual Assistant. This access enables your VA to view and edit your calendar, manage appointments, and send invites on your behalf. It’s a perfect solution for busy leaders, creators, and entrepreneurs who need assistance in managing their schedules.
Similarly, email delegation allows users to grant others access to manage their email accounts, enabling them to read, send, and delete messages.
Key Features of Calendar Delegation:
- View and Edit Access: Your VA can view all the details of your events and make changes as needed, including adding or modifying appointments.
- Sending Invites: Your VA can send invitations to meetings and respond to invites on your behalf.
- Full Calendar Visibility: Unlike shared calendars with limited visibility, delegation provides your VA full access to your schedule.
Benefits of Using Calendar Delegation:
- Time Efficiency: Delegating calendar management saves you significant time, allowing you to focus on more critical tasks.
- Better Organization: A VA can help organize your calendar more efficiently, ensuring a well-managed schedule.
- Reduced Scheduling Errors: With a dedicated person to manage your calendar, the chances of double bookings, missed client follow-ups or missed appointments are greatly reduced.
Security and Privacy Considerations:
- While delegating, you maintain control over your calendar. You can revoke access at any time, ensuring security and privacy.
- It’s important to delegate your calendar only to a trusted VA (shameless plug - try working with a trained, fully vetted Rekruuto VA without re-inventing the wheel), as they will have access to potentially sensitive information.
Steps to Grant Access and Delegate Your Google Calendar
Accessing Your Calendar Settings To begin the process of delegating your Google Calendar, you first need to access your calendar settings. Here’s how you can do it:
- Step 1: Open Google Calendar: Go to calendar.google.com on your web browser. Ensure you are logged in with the account you want to delegate.
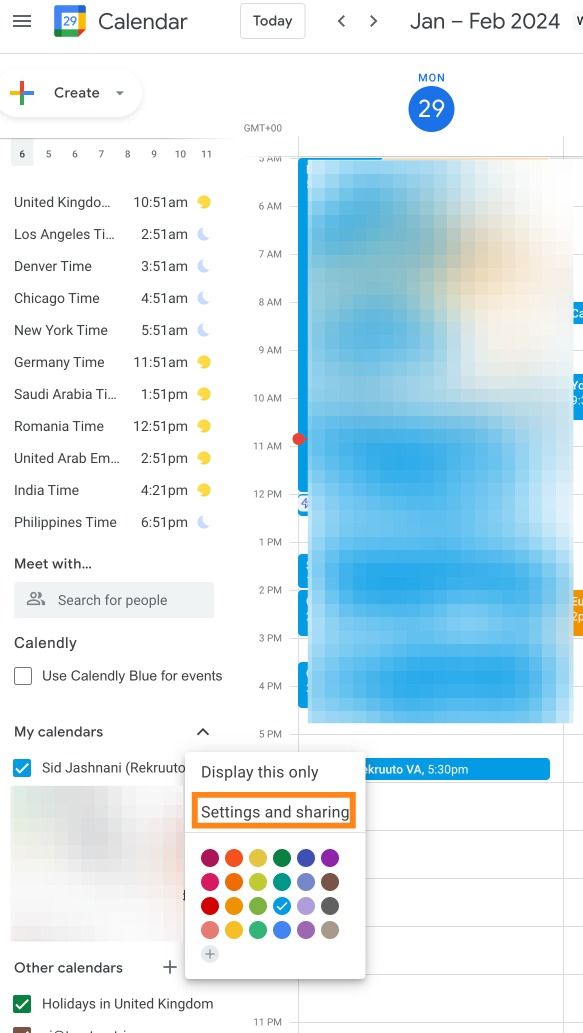
- Step 2: Navigate to ‘My calendars’: On the left side of the page, you’ll see a section titled ‘My calendars’. This section lists all the calendars you’ve created or have access to.
- Step 3: Access Calendar Settings: Hover over the calendar you wish to delegate, click the three dots for more options, and select ‘Settings and sharing’. This will open the settings page for your selected calendar. Navigating through Gmail settings is crucial for managing access and delegation within Gmail.
Granting Access to Your VA Once in the calendar settings, you can grant access to your VA by following these steps:
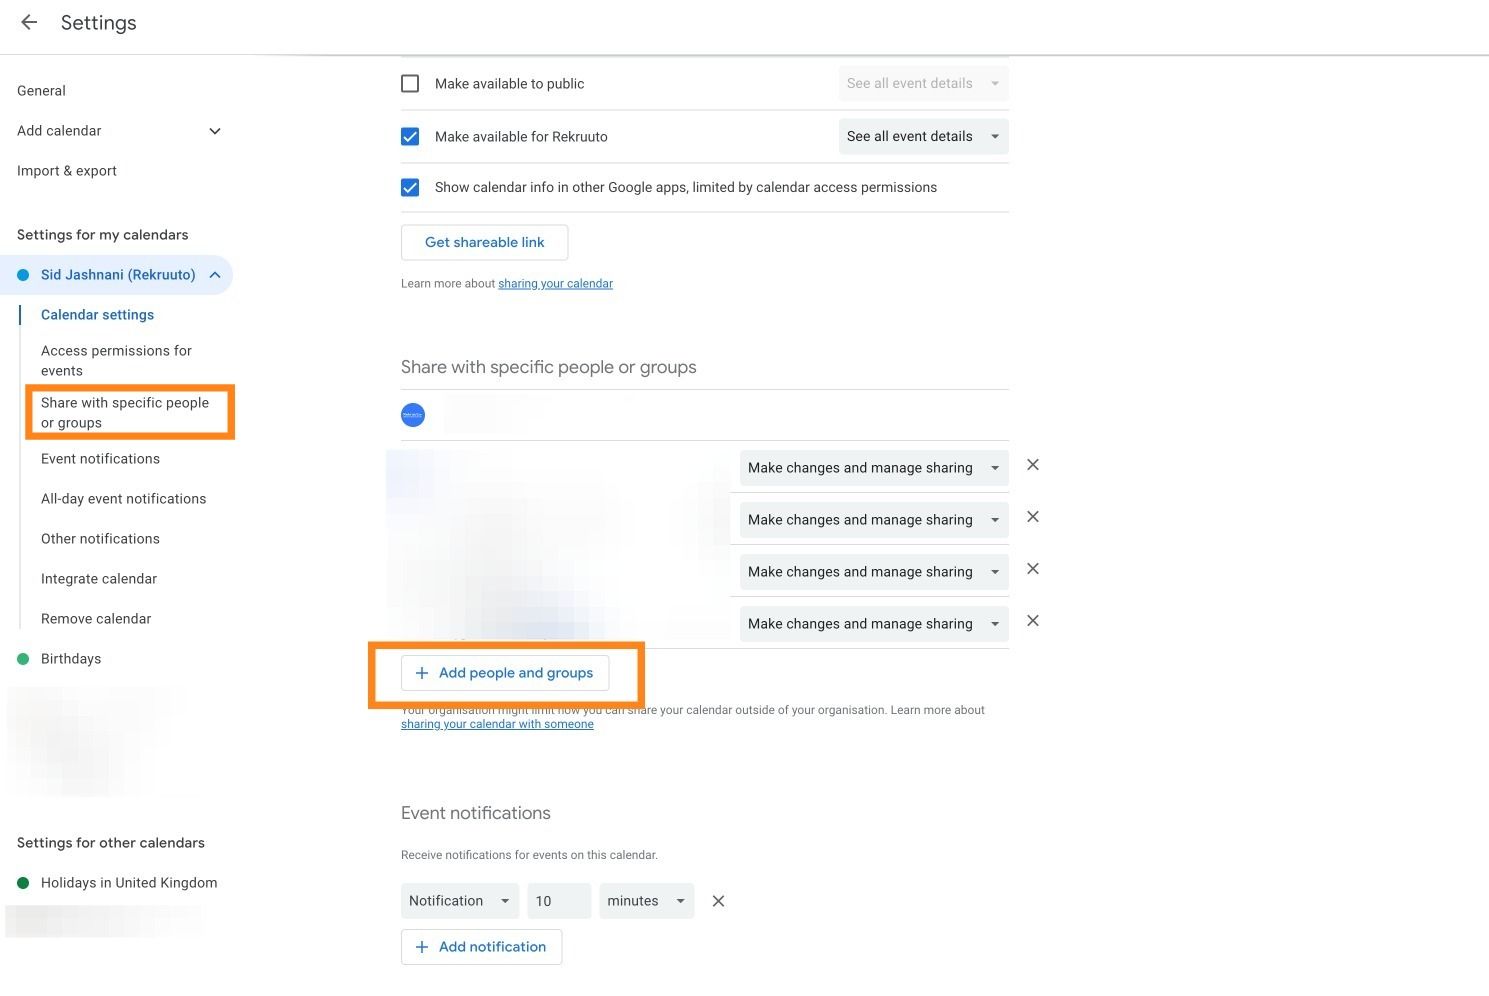
- Step 4: Locate the ‘Share with specific people’ Section: In the calendar settings, scroll down to find the section titled ‘Share with specific people’.
- Step 5: Add Your VA’s Email Address: Click on ‘Add people’ and enter the email address of your Virtual Assistant. Ensure that this is the email address they use for their Google Workspace account.
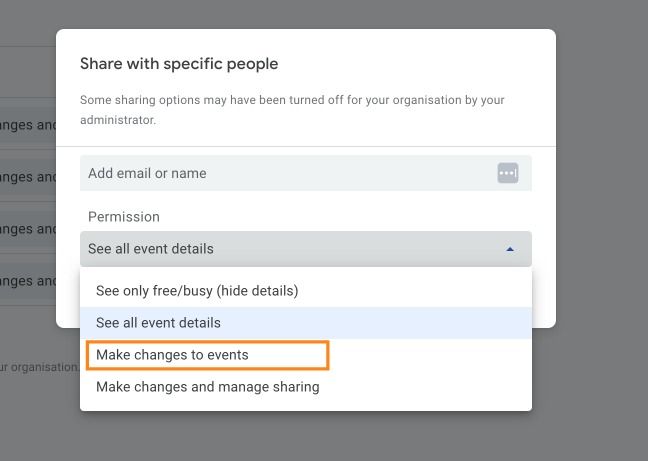
- Step 6: Set Permission Level: Choose the level of access you wish to grant. Google Calendar offers several options, ranging from the ability to see only free/busy information to making changes to events. Select the option that best suits the level of responsibility you’re delegating. Typically, for a VA, ‘Make changes to events’ is the most appropriate.
- Step 7: Confirm and Send Invitation: After setting the permissions, click ‘Send’. Your VA will receive an email invitation to manage your calendar.
Once you have delegated your Google Calendar to your Virtual Assistant (VA), implementing best practices in calendar management is essential for maintaining an efficient and harmonious schedule. Here are some key strategies to ensure successful calendar management:
Managing Delegate Access Permissions
Managing delegate access permissions is a critical step to ensure that your virtual assistant has the appropriate access levels to perform their tasks. Here’s how you can manage these permissions:
- Access the Admin Console: Go to the Google Workspace Admin Console and navigate to the “Users” section.
- Select the User: Choose the user who will be granting delegate access and click on the “More” dropdown menu.
- Delegate Access: Select “Delegate access” and click on the “Add delegate” button.
- Enter Delegate’s Email: Input the delegate’s email address and select the permissions you want to grant. Options may include viewing, editing, or managing email messages and calendar events.
- Save Changes: Click on the “Add” button to save the changes.
By carefully managing delegate access permissions, you can ensure that your virtual assistant has the right level of access to perform their duties without compromising security.
Once you have delegated your Google Calendar to your Virtual Assistant (VA), implementing best practices in calendar management is essential for maintaining an efficient and harmonious schedule. Here are some key strategies to ensure successful calendar management:
Setting Clear Guidelines
- Communication of Preferences: Clearly communicate your scheduling preferences to your VA. This might include preferred times for meetings, gaps you like between appointments, and types of events that should be prioritized. The account owner can customize the sender information in delegated messages, ensuring effective email management.
- Privacy Settings: Discuss which events are private or sensitive and should be handled with discretion. Ensure your VA understands how to mark events as private when necessary.
- Handling Conflicts: Establish a protocol for how to manage scheduling conflicts. For instance, which appointments can be rescheduled and which take precedence.
Subsection 3.2: Regular Review and Feedback
- Weekly Reviews: Set aside time each week to review your upcoming schedule with your VA. This ensures that you are both aligned on your weekly commitments and any potential scheduling challenges.
- Feedback Loop: Provide regular feedback on your VA’s management of your calendar. Acknowledge their successes and discuss areas for improvement to continuously refine the scheduling process.
Subsection 3.3: Utilizing Calendar Features
- Leverage Calendar Functions: Encourage your VA to use Google Calendar features to their fullest potential, such as color-coding different types of events, setting reminders, and including detailed event descriptions.
- Shared Calendar for Team Visibility: If applicable, consider setting up a shared team calendar. This can help in coordinating team meetings and ensuring everyone is aware of shared commitments.
Subsection 3.4: Training and Updating
- Initial Training: Provide comprehensive training on how to use Google Calendar, including creating events, sending invites, and setting reminders.
- Stay Updated on New Features: Google Workspace frequently updates its features. Keep your VA informed about any new calendar functionalities that can enhance scheduling efficiency.
Subsection 3.5: Adaptability and Continuous Improvement
- Adapting to Changes: Be open to adjusting the calendar management process as needed. Your schedule and needs might evolve, and your VA should be adaptable to these changes.
- Encourage Proactivity: A proactive VA can anticipate scheduling needs and make adjustments before conflicts arise. Encourage them to think ahead and be proactive in managing your calendar.
Additional Best Practice: Managing Time Zones
- Adding Multiple Time Zones: Train your VA to add and view multiple time zones in Google Calendar. This feature is particularly beneficial for setting up meetings across different geographic locations.
- Scheduling Across Time Zones: Your VA can utilize this feature to accurately schedule and manage appointments, ensuring clarity and avoiding confusion over meeting times.
Implementing these best practices will help in creating a well-organized and smoothly managed calendar, allowing you to focus more on your core activities while trusting your VA to handle your scheduling effectively.
By delegating your Google Workspace calendar to your VA, you can streamline your scheduling process, freeing up valuable time to focus on other critical aspects of your business. Following these steps and best practices ensures that your calendar is managed efficiently, securely, and in alignment with your specific needs.
✨ Ready to transform your schedule management? Our professional VAs at Rekruuto specialize in email and calendar management, helping you stay organized and efficient. Speak to a VA advisor now to discover how we can help!
Troubleshooting Common Issues
Even with careful setup, you may encounter some issues when using Google Workspace delegation. Here are some common problems and their solutions:
- Delegate Cannot Access Email: Ensure that the delegate has the necessary permissions and that their email account is set up correctly. Double-check the permissions granted in the Google Workspace Admin Console.
- Delegate Receiving Error Messages: Check the delegate’s email account settings to ensure they are configured correctly. This may involve verifying the email settings and ensuring there are no conflicts.
- Delegate Not Receiving Emails: Verify that the delegate’s email address is correct and that they are set up to receive emails. Ensure that there are no filters or forwarding rules that might be affecting email delivery.
By addressing these common issues, you can ensure that Google Workspace delegation is set up correctly and that your team can collaborate effectively. Proper troubleshooting ensures a smooth and efficient delegation process, allowing your virtual assistant to manage tasks seamlessly.